Electronics Lovnge

:warning: Thread needs a better title.
I urge anyone to suggest one!


The important Disclaimer part:

  1. :warning: Electronic devices, even when unplugged or battery powered can deliver fatal shocks when mishandled or opened! :warning:

  2. Opening devices will void the warranty. When you do it, it is your fault!

  3. You break it, your fault!

  4. This is the internet, it does not have a brain. Use your own!


Have an imaginary Q&A:

Q: What is this?
A: A general purpose place to discuss electronics at a component level, soldering techniques, tech help in the sense of “I want to Cap-Mod my amplifier, help!”, etc.

Q: Why?
A: Because 7 of you crazy people liked @Souldriver 's encouragement:

I will contain my (mildly) audio related tinkerings to this thread in order to keep noise down and signal high in other threads.

Q: What qualifies you?
A: Nothing, just doing this as a hobby

Q: Are you serious?
A: Always! Only serious here! No Funny!


How to get started (with any Topic):

  • Get a book
  • Watch videos on the subject you are interested in
  • Ask a friend
  • Ask strangers on the internet (preferably the helpful ones)
  • Learning by doing

Tools to get started:

  • Soldering iron - preferably a regulated one, does not have to be expensive, cartridge-heater types are preferable

  • tweezers - fine tipped, non-magnetic comes in handy

  • pliers - any size, for the bigger parts or gently applied extreme violence

  • Helping/third Hands - Because humans are somewhat limited in the grab&hold department

  • Good lighting - diffused light is nice, a head-lamp or phone display work too (speaking from experience)

  • Multimeter - Can be the hardwarestore-check-out-special, just don’t bring the probes near high voltages. Minimum viable Functions: AC and DC Volts and Amps, Resistance

  • Ruler/Caliper/tape measure - “Does this actually fit in here?”

  • screwdriver kit/bit set - To get in there in the first place

Tools that make things easier:

You don’t need any of these.

  • Calculator - yes, one with buttons that is always within reach!

  • Clamp meter/current clamp - Tick, Tick, is this thing on?

  • Better Multimeter - There is too cheap, and there is adequate, choose wisely!

  • Bench/Lab Powersupply - arbitrary voltage and current sources make life easier

  • Oscilloscope - like a volt-meter, but very fast. Can also draw pictures

  • Function Generator - because seeing what happens when is useful

  • thermal camera - “Where is it getting hot now?”

  • Electronic Load - “Is this PSU still okay?”


That bit about ESD

ESD, as in electrostatic discharge, is the big fun killer. Can totaly turn your “this works”-protoboard setup into a frustrating Saturday night, or cost your company billions.
When two objects move next to each other, the friction makes electrons move. Them not flowing freely builds up charge and :boom: goes the circuit.
Most devices when closed and handled properly are pretty safe from ESD, when you take the cover off, one little discharge may seriously hurt your wallet.
The proper way is to get a wrist strap (with a cable! These do NOT work wirelessly!), an ESD-mat and a common ground point (usually sockets into an electric outlet). All three connected together ensure everything and you are at the same voltage level at all times preventing static buildups and therefore discharges. Use only ESD-safe packaging (marked D, C or S) and ESD-safe tools. Test all protection devices and materials regularly, and so on.
At home: A ground-strap with a crocodile clip to connect yourself to the case of the device you are working on is likely sufficient. Since a full setup is less than 100$/€, consider getting one for the peace of mind.

13 Likes

Hadn’t thought of doing this thanks.

2 Likes

What about ‘Sonvs Shack’? Lol

2 Likes

2 hot 4 humor

1 Like

I recently started using ceramic tipped tweezers because they won’t become a heat sink when soldering and you can’t accidentally solder them to your work. lol

Anyway, asking the expert; I recently spent a couple of hours tinkering on this: https://forum.sonusapparatus.com/t/mojo-audio-thread-mystique-deja-vu-illuminati/912/89?u=db_cooper

Did I waste my time? Was there any real benefit? I had fun doing it, that counts right? I’m thinking of doing the same thing to my Bryston headphone amp. :slight_smile:

3 Likes

I also suggest a fan. Not to put on things directly but to help vent fumes away from you.

I was always ok working on building new electronics but was skittish on anything that had been used. Things need to be discharged right or they will discharge your life.

2 Likes

TRRS-Ampy

If this seems familiar, this project will be documented on the L1T-Forum

This project is probably peak-audiophile in a sense: I am investing money (not a lot) and time (probably too much) into fixing someone elses audio for my benefit.
Short story overextended: A friend of mine has a headset. Fair enough. Mic quality is above average I would say. Problem is the volume. Pushing things on the software side beyond the too-quiet settings results in extreme “using an air conditioner in a water fall as a mic”-quality.

The name is because of the likely headphone interface: TRRS in the sense of Mic, Ground, Right, Left,

Project goals are the following:

  • Provide a Mic Pre-Amp
    • Variable Gain
    • selectable Bias Voltage (for an electret Mic)
  • Seamlessly Interface with existing DAC/Amp USB-Dongle-thing (in the analogue realm!)
  • Run on USB power (= 2.5W limit)
  • Nice enclosure (= no cardboard engineering)

Optional Goals:

  • variable feedback on the mic-pre
  • Headphone Amp
    • Variable Gain Headphone Amp
    • Bypass switch

Initial Sketch:
While Dark-Mode friendly, this scribble was mouse drawn, contains errors, is incomplete and a general eye-sore:

The green Mic-Circuit consists of a linear regulator based bias voltage source, decoupling caps and some other boring bits. My idea is to use two halves of an NE5532 Op-Amp. One half will serve as a unity-gain buffer and the second half will have to do the actual gain followed by a volume control knob.

Red is half the headphone amp (imagine one in black for the left ear). I will base this on the NJM4580D, which is a high-current Op-Amp (high in this context is 80-ish mA = 0.08A). No idea about actual implementation with gain and so on.
The big headache in this area is the fact of not knowing anything about the incoming signal. May be ground referenced, may be something else. No idea. But capacitor coupling never hurt anyone, right?

Light-Blue is the Powersupply. Based on a DC-DC step-up regulator followed by quite extreme filtering (because the little brother of the unit is a noisy beast) before being stabilized by two linear regulators providing plus and minus 9 Volts for use with the Op-Amps.

The nightmare is with the multiple grounds I will have to deal with. And since I have never done this, I have no idea what to attempt. Just couple all of it together? LC-Lowpass them all together? Leave some floating?

To be continued.

Edit: In case anyone here understands the USB 3.2 Gen 1 spec well enough to give an informed explanation: Can I draw 900mA at 5V and if so, how?

5 Likes

You can get really fancy tweezers. Heat-absorbing ones, curved, pointy, flat, insulating, with BNC hanging out the end, etc.

Yup! Good call.

1 Like

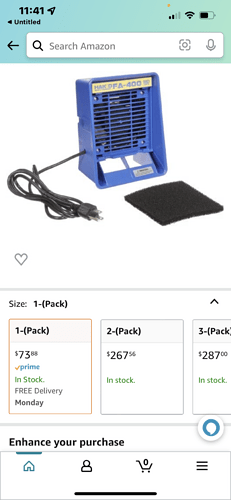
This is great - no need to even open windows.

https://smile.amazon.com/gp/aw/d/B00FZPSEY4?psc=1&ref=ppx_pop_mob_b_asin_title

I know the fumes are toxic but what is it about the fumes that’s toxic? The rosin flux?

I actually like the smell of it and wind up holding my breath while I solder and then blowing the smoke away when I exhale. :crazy_face:

3 Likes

Dont be doing that

2 Likes

Most people at home used leaded solder, the joints are better, and it’s easier to deal with.
But the particulates in even unleaded solder are not going to be good for you.
I hate soldering, do it when I have to and I did it for years with no regard to ventilation, hasn’t killed me yet, but I wouldn’t recommend taking the risk.

3 Likes

These are cool!! Very desk friendly!

Buy one for $73 or two for $267. :sweat_smile:

3 Likes

3 pack seems to be the deal at just an additional $20 vs the 2 pak and almost make back the loss from just one to 2 lol

1 Like

I’m not sure they understand how volume discounts work :joy:

2 Likes

Peep the 4 and 5 pack scaling

2 Likes

Jesus christ :sweat_smile: :rofl: :joy:

If you love DAC, get the chip history and spec’s behind here: Audio DAC and ADC History

List of DACs and their chipset:

…always,good to know and why certain, handcrafted DACs using quite,older chips and not latest onces…

3 Likes

Didn’t think I’d ever actually contribute anything here but this is actually something that blew my mind even though I’ve always known about the electronic and magnetic fields I’ve never actually stopped to think about the how as explained in this video. I got the answer right but I didn’t actually know the why I got the answer right. My basic assumption has obviously always been wrong. Like it states in the video, my teachers have lied to me, fed me a load of crap, yeah I’ll go with that.

To be honest, once you think about any power circuit in this way, the idea as to why so many things that shouldn’t matter, matter; becomes so much easier to accept.

1 Like

Dave from the EEVBlog put the physics aspects into perspective nicely:

1 Like